Project log
Rust Boy Advanced: Building a GBA emulator in the browser
Software · Emulation · Rust · WebAssembly
Growing up, I definitely played my Game Boy Advance more than any other system. I spent a lot of time on Pokémon Sapphire, LeafGreen, and Super Mario World. Each really ignited a sense of exploration in me - that I had literal worlds to explore in my pocket. I also loved that the system was completely backwards compatible, meaning I could still play all my old chunky Game Boy cartridges on it—Pokémon Red, Yellow, Gold, original Super Mario, and Pokémon Pinball, to name a few.
The fact that I had it all in my pocket was insane. I have so many fond memories of battling Gym Leaders or exploring while crammed in the back of the car, sitting in the dentist’s waiting room, or pretty much anywhere else. In particular I remember clearly the first time I fought Steven in Pokémon Sapphire - insisting to my dad that I be allowed to have the epic boss music playing while he was driving (he usually insisted that I play it in silence!). As an adult, I ended up buying a Switch and a Steam Deck just to try and recapture a bit of that proper handheld feeling - and Stardew Valley definitely gives me those same vibes.
Lately, I’ve been wanting to start a new side project, and I thought writing a browser-based emulator for the GBA would be a fun challenge. I’m calling it Rust Boy Advanced. It’s an excuse to extend my web development knowledge into the world of WebAssembly (WASM), and to have a bash at learning Rust, which is completely new to me.
The plan (and cutting some corners)
Any new project can bring endless rabbit holes, so I’ve had to make a few pragmatic design decisions early on to stop myself from abandoning it:
- Instruction-accurate over cycle-accurate: Building a perfectly cycle-accurate emulator (modelling every single pipeline stall) would take months of extra work. For version 1, I’m aiming for instruction accuracy. It’s good enough to play 99% of games and infinitely more realistic for a side project.
- Keeping it single-threaded (for now): I originally looked at using
SharedArrayBufferand Web Workers. I’ve decided to bin that idea for the first pass and just run the WASM on the main thread. Modern browsers should hit 60fps easily enough without the extra faff of threading. - Audio comes last: Audio is a nice-to-have, but you can play games without it (as my 10 year old self can testify). We’re going to play in silence until the graphics actually work.
How it actually fits together
Before we get into what I’ve built so far, it’s worth having a look at the architecture. I wanted to keep the web frontend as dumb as possible. All the heavy lifting is done by the Rust crate, which gets compiled into a WASM module.
Here is a rough architecture diagram:
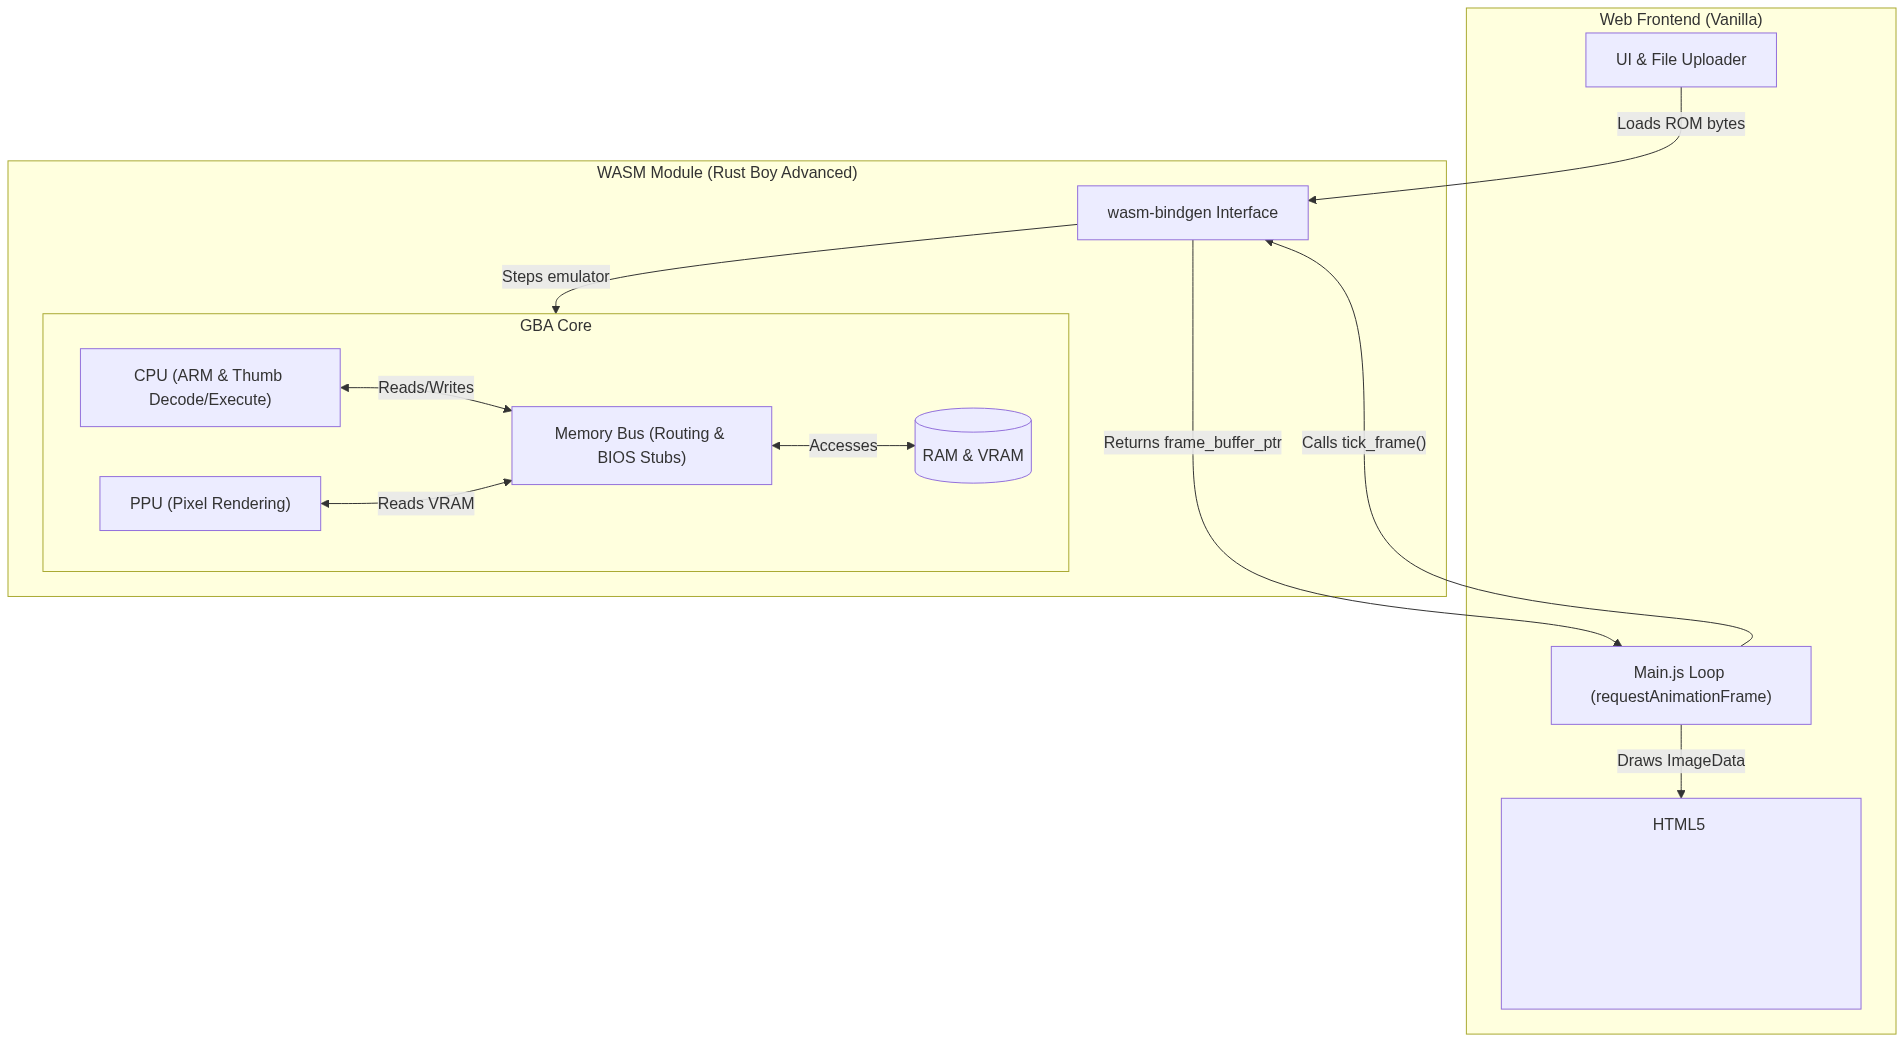
The JavaScript literally just runs a requestAnimationFrame loop. Every frame, it yells at the WASM module to tick_frame(). The Rust code then churns through CPU instructions until the PPU (Picture Processing Unit) says “right, I’ve finished a frame”. The JS then grabs the completed frame buffer straight out of the WASM linear memory and slaps it onto the canvas. What can go wrong?
Phase 1: A brain in a jar
I’ve broken the build down into six phases, and I’m quite pleased to say Phase 1 is done.
Right now, the emulator is entirely “headless.” It has no screen, no audio, and accepts no input. It’s currently just a brain in a jar pushing numbers around.
Here is what is actually working under the hood right now:
- The Scaffold: The Rust crate is set up, compiling, and talking to the frontend.
- The Memory Bus: The GBA has a specific memory map. I’ve built the routing logic that handles reads, writes, and memory alignment rules.
- The CPU: The GBA uses an ARM7TDMI processor, which runs two different instruction sets: 32-bit ARM and 16-bit Thumb. I’ve implemented the decoding and execution for both sets.
- BIOS Stubs: Instead of running the proprietary Nintendo BIOS, I’m using High-Level Emulation (HLE) to intercept software interrupts (SWI) and stub out the system calls myself.
How do you test a Game Boy without a screen?
If you’re building an emulator, you quickly realise that a fully working CPU is key to your success. Make one tiny mistake in how the carry flag updates on a weird 16-bit shift operation, and Pokémon will just silently crash on a white screen three menus deep. You need rigorous testing.
But how do you verify a CPU works when you don’t even have a screen to look at? You use Test ROMs.
The emulation community is frankly amazing, and people have written brilliant, open-source Game Boy Advance ROMs specifically designed to test emulators. The two big ones I’m relying on right now are armwrestler and jsmolka/gba-tests. Thank you to both creators!
Normally, if you ran these on a real Game Boy, they’d execute a series of complex CPU operations and print a big green “PASS” or red “FAIL” on the screen. Because I’m currently headless, I have to cheat a bit.
These ROMs are clever enough to write their test results into specific memory addresses before they try to render anything. So, my Rust integration tests simply load the ROM byte array, let the virtual CPU tick away for a few thousand cycles, and then I just peek into the emulator’s Work RAM to see if we got a pass code. It’s good enough for now, and I will be able to grab the visual output in a later phase
The Pipeline: What’s coming next?
A headless CPU that passes tests is a good start, but absolutely rubbish for actually playing Pokémon. Here is the roadmap for turning this calculator into a proper console:
Phase 2: Let there be light (PPU Bitmap Modes)
Next on the list is the PPU. I’m going to tackle the Bitmap Modes (Modes 3, 4, and 5) first. These are the simplest rendering modes. Getting them working will finally allow me to extract that frame buffer and paint it onto the screen. It won’t run commercial games yet, but homebrew demos and those visual test ROMs will finally work!
Phase 3: Tiles, Sprites, and Backgrounds
This is where it gets properly complicated. The GBA doesn’t just draw pixels; it draws layered backgrounds of 8x8 tiles, plus moving sprites (handled by the Object Attribute Memory, or OAM), and it has strict priority rules for what renders on top of what. Once this is done, commercial games will actually start showing their title screens.
Phase 4: Pushing buttons (Input, Interrupts, and DMA)
Seeing a title screen is nice, but I’d quite like to get past it. Phase 4 involves wiring up the keypad. Crucially, it also means implementing hardware interrupts and the DMA (Direct Memory Access) controller. Games use the DMA to instantly shunt massive chunks of data around memory. Without it, most games will just crash on boot.
Phase 5: Making some noise (Timers & Audio)
As mentioned, audio is a nightmare. The GBA has a mix of legacy Game Boy sound channels (pulse, wave, noise) and Direct Sound channels for playing actual audio samples. Synchronising audio buffers with the browser’s Web Audio API so it doesn’t sound like a dial-up modem falling down the stairs will be a huge milestone.
Phase 6: Polish and Save States
Finally, the bells and whistles. I’ll need to implement save types (SRAM, Flash, EEPROM) so I don’t lose my progress every time I close the tab. If performance is struggling at this point, this is also when I’ll revisit throwing the WASM module into a Web Worker.
Hopefully, my next update will include a screenshot of actual pixels being rendered by my code, assuming I can write Rust that is ever-so-more complicated than what I’ve written so far. Wish me luck!